Showing posts with label screenshot. Show all posts

Thursday, February 26, 2015

Extracting RAW pictures from memory dumps

Introduction

Earlier today, while reading my Twitter timeline, I saw some Infosec folks discussing about scripts/tools to identify RAW pictures in memory dumps. I decided, then, to write this blog post and share a small hack that I use to visualize data (including memory dumps).


A few months ago, I wrote a post detailing how to Scan the Internet & Screenshot All the Things, now it's time to Dump the Memory & Screenshot All the Things.


Memory Dumps

The first thing you will want to do is to narrow the analysis to the process containing interesting images/pictures. I'm going to use three different memory dumps here:

Remote Desktop Client - Windows 7 x64 (mstsc.exe)

Let's use the Windows built-in RDP client to connect to an external server and dump the process
memory using procdump:


procdump.exe -ma mstsc.exe mstsc.dmp


Microsoft Paint - Windows 7 x64 (mspaint.exe)

Let's load/save a simple image file on Paint and run procdump again:


procdump.exe -ma mspaint.exe mspaint.dmp


9447 2014 CTF Challenge: coor coor - Windows XP (VirtualBox.exe)
There's an awesome write-up for this CTF challenge here, go read it now if you haven't yet. We are going to use volatility to isolate the VirtualBox memory dump:

python vol.py -f challenge.vmem pslist


python vol.py -f challenge.vmem memdump -p 1568 --dump-dir=dump/


RAW Image Data

Rename the file extensions from *.dmp to *.data, download/install GIMP and open them as "RAW Image Data":


That's it, now you can use GIMP to navigate within the memory dump and analyse the rendered pixels/bitmaps on their corresponding offsets. It's worth mentioning that different images will be rendered using different Image types and variable widths: you may need to adjust these values accordingly.

So what can we spot here?

  • On the RDP memory dump, we can retrieve the tiles and Windows displayed during the connection, including IP's, usernames and commands:
Windows commands
Remote Desktop Client Window
RDP session
  • The Microsoft Paint picture can be easily spotted: they're upside down because that's the way BMP's are stored:
We need upside down backdoors "this big"

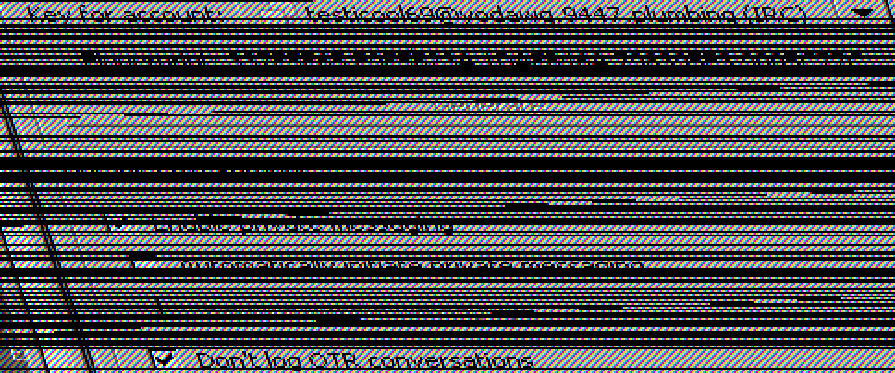
  • The most interesting artifacts were collected from the Coor Coor dump. The user was running a TrueCrypt container inside VirtualBox and after some offset adjustment we can see the Pidgin Window, the user account (testicool69@yodawg.9447.plumbing) and a few OTR settings:
While True: width ++ || width--

Notice that the Windows are not perfectly aligned here, but we can see the data by zooming in:

Enhance pls

Looks like our killer is screwed. YEEAAAH.

We can also spot the Window taskbar, just like the volatility screenshot plugin showed us on the previous write-up:


python vol.py -f challenge.vmem screenshot -D screenshot/

It's also possible to spot icons from the running programs, like this one from Virtualbox:

VirtualBox icon


Conclusion

This technique is very common among ROM hackers as they try to find image patterns inside raw game dumps. Check my write-up from Hack.lu 2014 CTF to find more about it. By the way, you can also use Tile Molester instead of GIMP to browse the RAW data.

You may be asking - why not carve the dumps using binwalk and foremost or extract them using the dumpfiles volatility module? If you try it yourself you will notice that they won't find the magic bytes for all those images.

As far as I know, there's no off-the-shelf tool to automagically extract them, but it should't be that hard to write a binwalk/volatility plugin for this based on some heuristics. Binwalk, for example, can find raw deflate/lzma streams by building headers on top of the raw compressed data and writing it back do disk.

I'm no Computer Visualization expert, but here's a few suggestions:

  • Set the image width to common display resolutions. The taskbar from the coor coor memory dump could be displayed by setting the width to 1440 points (1440x900 is a common screen resolution).
  • Use common window background/patterns as a template to find interesting sections.
  • Create a multi-view/side-by-side RAW image browser based on GIMP source code (multiple image types, multiple widths etc).
  • Use Google's artificial brain to find cat videos.
  • Get a bigger monitor (yeah, it helps).

I hope you all use these skills wisely, avoiding any kind of superfishal investigation like our Lenovo friends.


Sunday, August 17, 2014

Scan the Internet & Screenshot All the Things

During Defcon 22, @ErrataRob, @paulm and @Viss (mass)scanned the Internet and presented some Tips, Tricks and Results. Lots of people confronted @Viss after he posted some VNC screenshots on his Twitter timeline. He posted a follow-up article on his blog and Kashmir Hill, from Forbes, wrote an article about the exposed VNC services.

Internet scanning isn't new anymore and people are still surprised with these results. For this post, I'll share some techniques I commonly use to map and screenshot several Internet services during pentest engagements. All this could easily be adapted for other protocols and services, so let's start to Screenshot All the Things.


VNC

The easiest way to snapshot these services is to use preexisting tools and script/mod them according to your needs. In order to take screenshots from VNC, I generally use noVNC (an HTML5 VNC client) and a command line utility to capture the WebKit's rendering of a web page.

The process is pretty straightforward:

1 - Clone the noVNC project from github:

git clone git://github.com/kanaka/noVNC

2 - Start the mini-webserver and specify the location of the VNC server you want to screenshot:

./noVNC/utils/launch.sh --vnc 192.168.1.142:5900


3 - Take a webpage screenshot from command line using CutyCapt, for example:

cutycapt --url="http://127.0.0.1:6080/vnc_auto.html" --javascript=on --out=vnc.png --delay=3000


4 - Profit!!!

Now all you have to do is masscan the target for ports 5900-5910 (used by VNC), save the results on a text file and create a simple script to take the screenshots. You can also try vncsnapshot, used by @paulm during his Toorcon 2013 talk.

RDP

My tool of choice for taking snapshots of RDP services is Spark View. There's an HTML5 version for the tool available here and the process is quite similar to the VNC one:

1 - Download and install Spark View for Windows or Linux. Follow the procedure from the Admin Manual, install J2SE JDK, set the JAVA_HOME environment variable, extract, configure and compile the utils from commons-daemon-native.tar.gz. On Debian derivatives, you may need to edit SparkGateway.sh and change the source function library to "/lib/lsb/init-functions".

2 - Start the service (./SparkGateway.sh start) and test it by accessing your local IP on port 80. Remote Spark provides a live demo for their solution here.


3 - Specify the RDP server settings on the querystring and take a webpage screenshot using a command line tool. I'm going to use phantomjs + url-to-image.js for this example:

phantomjs url-to-image.js "http://127.0.0.1/rdpdirect.html?gateway=127.0.0.1&server=192.168.1.189&width=800&height=600&color=16" rdp.png 800 600


4 - Profit!!!

Some commercial tools like Nessus also connects to RDP services and captures screenshots. Taking screenshots from RDP services is very useful to fingerprint operating systems and to map/identify domains and users on the network. I always output these images to OCR tools like tesseract and gocr in order to generate wordlists and compile other useful data:

RDP screenshot
gocr output
tesseract output

HTTP

There's nothing much to be said about Web Services screenshots. There are lots of posts covering this topic and lots of different tools, including an Nmap plugin. Some references:

- Using Nmap to Screenshot Web Service (http-screenshot.nse)
PaulDotCom Security Weekly 295 - Tech Segment


EyeWitness - A Web Application Triage and Info-Gathering Tool


Conclusion

I find these tips very useful to get a better view of network services. Now that reporters are getting a pretty good idea from the attackers perspective, you have no excuse to leave your curtains exposed to the Internet without a VNC password. It's also important to practice safe computing, changing default passwords and enabling Network Level Authentication for RDP services.